Posts
Showing posts from 2011
Leafy green jacket (well, beginnings of!)
- Get link
- X
- Other Apps
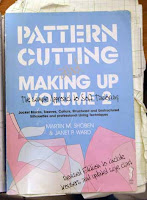
I've started working on Evie's (=DollZone Kimi) jacket first of all because I have a clear idea of how I want it to look and then I'll be developing the rest of the outfit around that. Might be a bit of a backwards way of doing it, but in a way I quite enjoy the experimental aspect of doing it this way rather than just replicating a fixed design idea. The plan is to make a jacket with tails that has varied stripes of green to make it look quite leafy. So, I'm using this pattern cutting book which I got ages ago and I converted all the sizing down to fit this MSD size dolly. Scaling down from size 12 measurements by dividing them all by a scale factor of 5 seems to have done the trick to fit her. I then cut a toile out of thin vilene and sewed in all the darts according to the pattern. And these are some of the fabrics I'll be using, and here's a rough idea of what the leafy 'tails' will hopefully look like: Just testing out
Welcome home DollZone Kimi!
- Get link
- X
- Other Apps
Here is my new little beauty, my first proper BJD! She is a resin, MSD size dolly with double joints (which I'm liking a lot). Before she even arrived I started making a wig for her, so that she wouldn't be completely naked for so long. It came out quite well, I followed the same method as detailed in my post from April this year, with a slight difference. On my Hujoo Berry's wig I was using Alpaca wool fibre for the hair, whereas this time I decided to try synthetic Kanekalon hair used by hairdressers for wigs and hair pieces. As well as preparing the strips of hair by gluing the ends, this time I glued them onto strips of very thin vilene and I also sewed across them once dried for extra hold. I then sewed these strips to the wig cap as below: So as you can sort of see I started at the bottom on the back of the wig cap and worked my way up and around the head, sewing each of the strips of hair to the cap. I did take quite a bit longer of cours
Say hello to my little friend!
- Get link
- X
- Other Apps
It's been a long old while since I last posted anything, but you know how it is ;) But that doesn't mean I haven't been busy! In fact, I finally finished my little handmade ball jointed goblin. Take a look! Unfortunately these were taken on my old camera so they're not the most brilliant photos, but I just wanted to get a couple of snaps up. And I was chuffed that I finally finished him! On my Doll Making page you can see the beginnings of the process, which followed the Ryo Yoshida method, using LaDoll Premix. Once I'd done a lot of sanding I applied a waterproofing agent to seal the paper clay and then painted in acrylic on top. The body blushing was done using pastels and then all the pieces were sprayed using a Matt Varnish. Then all was strung together using elastic and Voila! - a cheeky, lil green gobbo is born. Now all he needs is a sweet little outfit. He is going to be a little friend for my new BJD - DollZone Kimi - who I got fo
Steampunked & Gorgeous - Hujoo Berry is complete!!
- Get link
- X
- Other Apps
" krrrrsshh ...Hello London?...Come in London...Hujoo Berry on a mission to save Big Ben from the dastardly Cog-Thief of Old Kentish Town... Over.. krrrrsshh ." Top hat with its eyepiece and straps. On the ends are small magnet fastenings I got from a bead shop and sewed on the ends for easy fixing. They're quite strong so hold very well. At the moment she still has a factory face-up, I only added a little extra colour to the lips. Not having done a face-up before I wanted to get some practise in first on other dolls. My super-duper hubby made this awesome piece - "The Winston Biofragmentation Rifle" here showing the back. With adorable Biofrag refills (the green rods) "The Winston Biofragmentation Rifle" from the front This fine contraption is "Dr. Schicksal's Wrist-mounted Ruffian Repudiator", in other words it repels and erases any trouble-
On Top of the World: Top-Hat!
- Get link
- X
- Other Apps
These are the steps I followed for making an adorable leather-covered mini top-hat! Firstly, I cut a loo roll* down to size for the tube part (I know, so 'Blue Peter') and cut a circle out of stiff card. Out of this I cut the centre circle for the top of the hat, using a sharp cutting knife. This circle has to be equal to the internal size of the tube, even a few millimetres smaller depending on the thickness of the fabric covering it. (*If making a full-size hat, this would of course be too small, and the circumference of the doll's head would have to be used as the correct circumference) Then I cut a piece of leather long enough to cover the circumference of the loo roll tube plus an extra 1-2cms to make a neat fold-over at the join. I also gave it 1cm extra width at each side, so that it could be folded over and glued to the inside of the tube. Again for this I used UHU glue because it dries fast and glues leather rather well (although you usually have to keep