On Top of the World: Top-Hat!
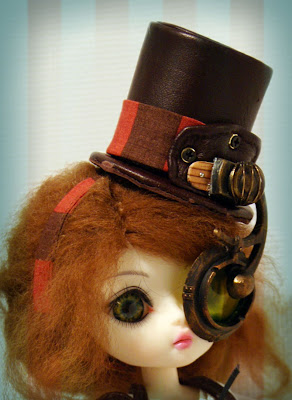
These are the steps I followed for making an adorable leather-covered mini top-hat!
Firstly, I cut a loo roll* down to size for the tube part (I know, so 'Blue Peter') and cut a circle out of stiff card. Out of this I cut the centre circle for the top of the hat, using a sharp cutting knife. This circle has to be equal to the internal size of the tube, even a few millimetres smaller depending on the thickness of the fabric covering it.
(*If making a full-size hat, this would of course be too small, and the circumference of the doll's head would have to be used as the correct circumference)
Then I cut a piece of leather long enough to cover the circumference of the loo roll tube plus an extra 1-2cms to make a neat fold-over at the join. I also gave it 1cm extra width at each side, so that it could be folded over and glued to the inside of the tube. Again for this I used UHU glue because it dries fast and glues leather rather well (although you usually have to keep the tube upright so it doesn't squish everywhere).
Then I cut two equal circles out of leather with which to cover the brim of the hat, with a smaller circle out of the middle.
One side of the card was covered in glue - I used UHU glue, because I've found this to bind leather very well especially on the soft, fuzzy inner side and it dries quickly, but I'm sure PVA would do the trick too if used carefully. The card was placed centred on one of the leather circles and once secure, I cut small triangle darts into the leather just short of the card, using sharp little embroidery scissors. This was so that there wouldn't be lots of bunched up leather where the curves cause it to fold. I then spread glue on the card bit by bit and stuck down the leather to it, working around the outside of the brim first. I then repeated this on the inside, in the hole of the brim, glueing this inner part on top of the secured outer rim.
 Now to covering the other side of the brim. Once the glue fixing the leather to the card was dry, I added more glue to on top of this and placed it directly onto the second leather circle. Once dry I carefully trimmed the edges closely to the outer rim to get a neat edge. I didn't fold it under again as before because of the bulkiness of the leather, but if I had been using fabric I would have. Instead I decided I would run a thin ribbon (3mm) around the edge of the brim to give it a neat edge.
 Next I glued the last card circle for the top of the hat to a oiece of leather and then cut this out, adding an extra 1cm around the circumference of the card. Again I cut out small triangles around the edge, but did not glue this to the underside of the card. Instead I pushed the circle through the tube from the other side so that the excess fabric was pushed flush against the inside of the tube. Then (and this was a bit tricky but I couldn't think of another way), from the other side I squirted glue between the excess leather and the tube, thereby gluing it to the inside.
Firstly, I cut a loo roll* down to size for the tube part (I know, so 'Blue Peter') and cut a circle out of stiff card. Out of this I cut the centre circle for the top of the hat, using a sharp cutting knife. This circle has to be equal to the internal size of the tube, even a few millimetres smaller depending on the thickness of the fabric covering it.
(*If making a full-size hat, this would of course be too small, and the circumference of the doll's head would have to be used as the correct circumference)
Then I cut a piece of leather long enough to cover the circumference of the loo roll tube plus an extra 1-2cms to make a neat fold-over at the join. I also gave it 1cm extra width at each side, so that it could be folded over and glued to the inside of the tube. Again for this I used UHU glue because it dries fast and glues leather rather well (although you usually have to keep the tube upright so it doesn't squish everywhere).
Then I cut two equal circles out of leather with which to cover the brim of the hat, with a smaller circle out of the middle.
One side of the card was covered in glue - I used UHU glue, because I've found this to bind leather very well especially on the soft, fuzzy inner side and it dries quickly, but I'm sure PVA would do the trick too if used carefully. The card was placed centred on one of the leather circles and once secure, I cut small triangle darts into the leather just short of the card, using sharp little embroidery scissors. This was so that there wouldn't be lots of bunched up leather where the curves cause it to fold. I then spread glue on the card bit by bit and stuck down the leather to it, working around the outside of the brim first. I then repeated this on the inside, in the hole of the brim, glueing this inner part on top of the secured outer rim.
 Now to covering the other side of the brim. Once the glue fixing the leather to the card was dry, I added more glue to on top of this and placed it directly onto the second leather circle. Once dry I carefully trimmed the edges closely to the outer rim to get a neat edge. I didn't fold it under again as before because of the bulkiness of the leather, but if I had been using fabric I would have. Instead I decided I would run a thin ribbon (3mm) around the edge of the brim to give it a neat edge.
So at the moment there is still the excess leather on the inside of the brim from the circle just glued on. As before I made some triangle cut-outs to this, but this time used them as the way to secure the brim to the tube. I spread glue on the fuzzy side of the leather and then offered it up to the already covered tube on top. Folding the leather into the tube it gets glued to the inside of the tube, so you won't see any joins or glue on the outside.
 Next I glued the last card circle for the top of the hat to a oiece of leather and then cut this out, adding an extra 1cm around the circumference of the card. Again I cut out small triangles around the edge, but did not glue this to the underside of the card. Instead I pushed the circle through the tube from the other side so that the excess fabric was pushed flush against the inside of the tube. Then (and this was a bit tricky but I couldn't think of another way), from the other side I squirted glue between the excess leather and the tube, thereby gluing it to the inside.
Now the only thing left is to add some ribbon or fabric strips so that the hat can be held on securely. I measured around the head from the one side of the inside of the hat to the other to make sure the fabric strips I had were long enough. I then simply glued one end in each side and waited for it to dry before letting Hujoo Berry try it on.
And that's it! It can now be decorated however you fancy!!
It has a swivel-down eyepiece made from various bits, including plastic model kit parts and a piece from an old chest of drawers. I have some more steampunky bits to add, but it's getting there =D
Next up: I have some fantastic accessories in progress thanks to my super hubby's help, including a steampunky gun and walkie-talkie! Coming soon!!


Comments
Post a Comment